
Pi Network : A Mobile-First Crypto Revolution
Pi Network is a new type of cryptocurrency that you can earn directly from your mobile phone. It was created to make crypto mining easy for everyone , even people who don’t understand complex technology . In normal crypto mining like Bitcoin , you need expensive computers and a lot of electricity. But with Pi Network , you just need a smartphone and internet connection. Once you install the Pi Network app, you can start mining Pi coins , it does not use your battery or data , and it runs quietly in the background. Pi has a strong community of over 50 million users worldwide , who are mining on a regularly basis .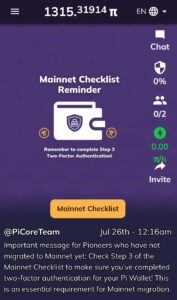
Here are the step by step guide :
1 – Installing the Pi App
The first step is downloading the Pi Network app from the Google Play Store or Apple App Store . The app is free to use and lightweight , its interface is simple and easy to use . Once downloaded , you will be asked to sign up using your phone number or Facebook account . After that , you will have to choose a username and provide a referral code , which is necessary to join . You can use a friend’s code or find one online ( youtube or google ) , but without a referral code , you won’t be able to start mining .
2 – How To Use Pi Network App for Mining
After login , you will see a lightning button (⚡) just tap on it , it turns green in colour after tapping and you have to come every, 24 hours to start mining again . That’s all , You don’t have to keep the app open or do anything else , close the app after taping the button , it does’nt requires a dada after that and it does not use much battery or mobile data .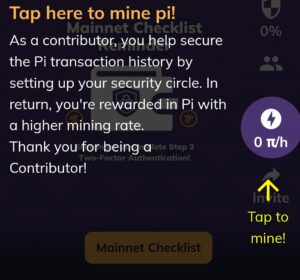
To earn more Pi coins , you can invite your friends and build your team . You can also create a security circle for more mining speed . Every day , you just have to open the app and tap the button again .
3 – Creating a Pi Wallet to Store Your Coins Safely
After you’ve mined some Pi coins , the next important step is setting up your Pi Wallet . Pi wallet is a place where your all pi coins will stored safely and later use them for transactions or sending them to other users .
Step 1 – You can create your wallet using the Pi Browser app , which is different from the main Pi Network app but linked with it , you can download it from play store or a app store .
Step 2 – { Most important } Once the browser app opens , Click on “Pi Wallet”/ wallet , Once you click that , it will generate a wallet for you and give you a 24 word passphrase ( passphrase is like the password of your wallet , Never share it with anyone , if you lose it , you can lose access to your coins and someone can steal your Pi coins , So write down the private key on paper and keep it in a safe place ).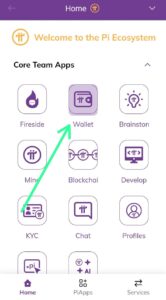
Step 3 – After saving your private key / passphrase , the wallet will ask you to confirm it by typing the key again . Once done, your wallet is ready . Now your Pi coins will be stored here safely.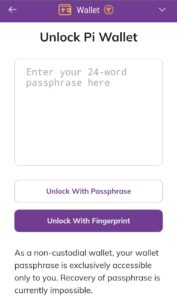
You can check your wallet balance by going to the Pi Browser and opening the wallet again . Later, when Pi becomes tradable, you can also use the wallet to send or receive Pi coins.
If you’re doing KYC verification , make sure your wallet is ready before that . Only users with a wallet and completed KYC will get their mined Pi coins transferred to the Mainnet .
4 – How to Do KYC ?
Doing KYC (Know Your Customer) in the Pi Network app is very important if you want to transfer your mined Pi coins to the Mainnet . Without KYC , your coins will not be counted. Here’s how to do it in a few easy steps :
Step 1- Open the Pi Network App
Open the Pi Network app on your mobile phone . Make sure you have already verified your phone number or Facebook account.
Step 2 – Go to Main Menu
Click on the three lines (☰) at the top-left corner of the screen to open the menu .
Then tap on “Pi KYC” or “Mainnet” section.
Step 3- Check KYC Eligibility
If you are selected , you will see an option that says “Submit KYC” or “Start KYC Process .”
If you don’t see this , wait for it , Pi is doing KYC in batches , you’ll get notification from the pi app .
Step 4 – Install Pi Browser App
The Pi Network will ask you to download the Pi Browser app .
Step 5 – Go to “KYC” Section
Open Pi Browser – Tap on “KYC” option.
Here, you’ll be asked to fill in your details and upload documents.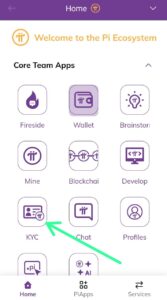
Step 6 – Submit Your Identity Document
The app will now ask you to fill out your details and upload a valid government-issued ID. In the U.S., this can be :
-
Driver’s license
-
State ID
-
Passport
Step 7 – Face Verification
After uploading the ID , you’ll be asked to complete a facial recognition step . Just follow the on-screen instructions , it will take a live selfie video .
Once submitted , your KYC status will be “Under Review.” Approval may take a few days , depending on the traffic .
Once You’re Approved – You’ll receive a confirmation inside the app , your mined Pi will start moving to your Mainnet wallet .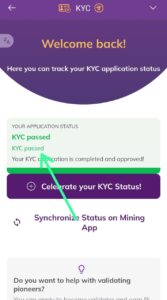
The Pi Network uses a third-party verification system , and only selected users get invited for KYC in phases . When it’s your turn , you will be notified in the app .
5-Transferring Your Pi Coins to Mainnet Wallet
After mining Pi coins daily for so many months , the main goal is to finally move your coins to the Mainnet Wallet . This is where your Pi coins become real and useful in the future .
First , you need to make sure your KYC (Know Your Customer) is done and your wallet is ready , without KYC , your mined Pi coins will not be transferred, your Pi coins will start moving to the Mainnet Wallet automatically . You don’t have to press any button ,it happens by itself. You’ll see your updated balance under “ Pi Mainnet Balance” inside the app . Open pi browser then tap wallet and paste your 24 word Passphrase .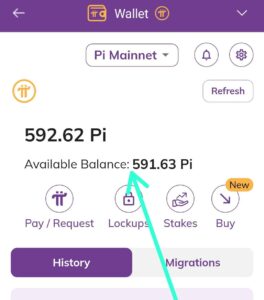
Some of your coins might be locked for a few months (based on your lock-up preference), and the rest will be transferable .
How to Invite Friends and Earn More Pi
Inviting friends is one of the easiest ways to increase your Pi coin earnings . The Pi Network gave rewards users , who help grow the community by bringing in more people . Just share your invite code and let your friends start mining .
When your friend signs up using your code, they join your Earning Team , means both of you will get bonus mining speed . But remember, your bonus will only apply when both of you are active , so ask your friends to mine every day and try to invite people who are genuinely interested in cryptos .
Avoid Scams in the Pi World
In case you ever get stuck while using the app , there’s a Help section within the app and in the Pi Browser as well . You’ll also find helpful resources on Reddit , Telegram groups, and YouTube channels , but be careful -many scammers also target Pi users now a days . If someone offers to buy your Pi or asks for your wallet passphrase , stay away from it . Never share your wallet keys and never try to trade your Pi Coin before the official launch .
You may check also :
What is pi coin ,is it worth anything , legit or scam ?
Pi coin price drop 80 % after mainnet launch ?
Final Thoughts
Complete your KYC, set up your wallet, and wait for the network to grow stronger.You don’t have to spend any money. No risk is there. Just open the app daily and tap the button to keep mining.
Right now, Pi is still in development. It is not yet listed on major exchanges like Binance or Coinbase . But many good signs are there , KYC is happening fast , Mainnet is live, wallet setup is easy, and more apps are coming inside the Pi ecosystem. This shows that the team is working seriously .